Installation Instructions
Note: when typing the commands shown in these instructions do not type the leading$ before each command; it indicates the
prompt. These instructions will refer to your home directory as
$HOME. You can type $HOME in the commands
or you can use the fully qualified path to your home directory which
may be something like /home/yourname/. Note that you can
find out the location of your home directory by logging in and
typing pwd or echo $HOME.
The DRIP ToolKit requires the following prerequisites:
- Cygwin (if using Windows)
- g++ compiler
- the Graphical Models ToolKit (GMTK)
- Python 2.7
- argparse and numpy python packages
- SWIG
- Optional: Matplotlib (if the plotting functionality, as described here, is desired; Cygwin instructions to build matplotlib)
Download and unzip the DRIP ToolKit. In the unzipped directory, build the pFile package (necessary for creating GMTK observation files in python) by running:
If no error messages are output, the DRIP ToolKit is now ready for use!
Searching tandem mass spectra using DRIP
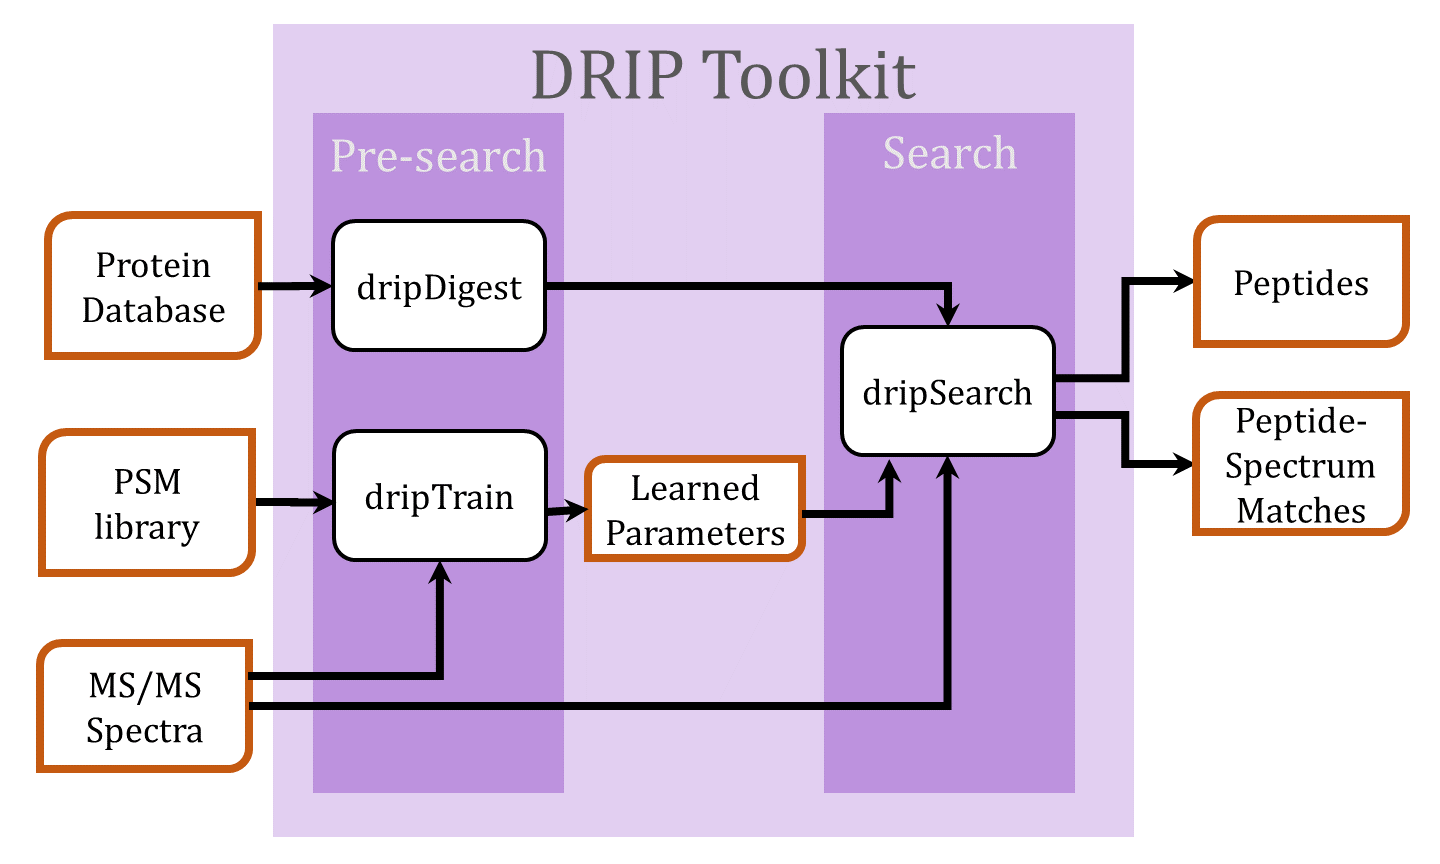
- Digest the protein database FASTA file using dripDigest (detailed here)
- Search spectra using dripSearch (detailed here)
- For a low-resolution MS2 search and given a set of high-confidence peptide-spectrum matches (PSMs), DRIP model parameters may be trained prior to the search using dripTrain.py (detailed here)
- Prepare data to be searched by dripSearch on a compute cluster (detailed here)
- Recalibrate DRIP PSMs by charge (detailed here)
Training DRIP using dripTrain
Before a low-resolution MS2 search, and assuming a set of high-confidence training PSMs, DRIP may be trained using dripTrain.py. The set of high-confidence PSMs must be in a tab-delimited format with fieldsPeptide, Scan,
and Charge (sample PSM file
format). The MS2 spectra for these PSMs must also be supplied
in .ms2 file format.
In the unzipped DRIP ToolKit directory, the directory riptideTrainingData contains
high-confidence PSMs (strict-orbitrap-uniqueSids.psm) and
spectra (strict-orbitrap-uniqueSids.ms2). We may utilize
these files to train DRIP using
Upon completion, the program will produce two files,
dripLearned.means
and dripLearned.covars containing the learned DRIP
Gaussian means and covariances, respectively. These parameters may
then be utilized by dripSearch. The output mean and covariance file
names may also be set usingStatic modifications may similarly be passed to dripTrain, as specified here.
Digesting a FASTA file using dripDigest
Before searching an.ms2 file, we must first digest the
protein database FASTA file using dripDigest. DripDigest writes the
digested peptides to binary files in the local directory specified
by --digest-dir. If recalibrating PSMs by charge, as
described in
Section Recalibrating PSMs
by charge, --recalibrate must be set
to True (this creates a second set of decoy PSMs used
to recalibrate differently charged PSMs).
The FASTA file is passed specified using the
flag --fasta. If a set of decoy
PSMs are desired to be searched and output, the
flag --decoys must be set to true. If it is desired that
the results of dripSearch be recalibrated, so that differently charged
PSMs are comparable to one another, the
flag --recalibrate must be set to true (in which case a
second, disjoint set of decoys is created, searched, and used to
perform the recalibration. Static modifications, variable
modifications, constraints on peptide lengths and masses, and many
other settings may similarly be passed to dripTrain, as
described here. Let's look at an
example digestion,
| dripDigest Option | Meaning |
| --digest-dir dripDigest-output | Specify the directory to write the digested peptide
binary files as dripDigest-output (this is
the default value). |
| --fasta plasmo_Pfalciparum3D7_NCBI.fasta | Digest FASTA
file plasmo_Pfalciparum3D7_NCBI.fasta. Program will
exit with an error if a FASTA file is not specified. |
| --min-length 7 | Valid digested peptides must have minimum length 7. |
| --custom-enzyme '[K]|[X]' | Cleave at every Lysine irregardless of the following amino acid (specifying other enzyme options, including custom enzymes and standard enzymes such as trypsin, is discussed at length here) | .
| --mods-spec 'C+57.0214,K+229.16293' | Define static modifications of +57.0214 to Cysteine and +229.16293 to Lysine. |
| --nterm-peptide-mods-spec 'X+229.16293' | Define an N-terminal static modification of +229.16293 to every amino acid. |
| --monoisotopic-precursor true | Calculate peptide monoisotopic masses. |
| --digestion full-digest | Every peptide must have two enzymatic termini. Partial digests (where peptides have only one enzymatic terminus) are also supported. |
| --missed-cleavages 0 | Allow no missed cleavages. |
| --decoys True | Create decoy database. The set of decoys constructed is disjoint from the original, target peptide database. |
| --decoy-format shuffle | Shuffle target peptides to create decoys. Decoys may also be
created by reversing target peptides, specified
by peptide-reverse |
| --keep-terminal-aminos | Keep the N-terminal and C-terminal amino acids of the target peptide when creating a decoy. |
| --peptide-list true | Write all digested peptides (target and decoys) and their masses to ascii in output directory. |
Searching spectra using dripSearch
DripSearch operates in several modes. To run in standalone
mode (i.e., on a single machine), set --cluster-mode False.
A standalone search using DRIP is designed for multithreading on
CPUs with multiple cores. Different DRIP models are utilized when
searching either low-resolution or high-resolution MS2 spectra. For
the former, the location of Gaussian centers used by DRIP to
score fragment ion matches may be learned
using dripTrain, and for the latter, the location of
the Gaussian centers used by DRIP to score fragment ion matches is
the exact b- and y-ion values (reflecting the improved machine
accuracy). Note that, in dripDigest,
when --recalibrate is set to true, dripSearch automatically
searches a secondary database of decoy peptides and recalibrates the
output PSMs.
Let's look at an example standalone DRIP search run. Assume that
we've trained DRIP using the command
in "Training DRIP using
dripTrain" and digested the FASTA file using the command
in "Digesting a FASTA file using
dripDigest." Given the dataset plasmodium.ms2, we
could perform a DRIP search using
| dripSearch option | Meaning |
| --digest-dir dripDigest-output | The output directory of dripDigest containing the
digested peptide databases in binary format. |
| --precursor-window 3.0 | Precursor mass error tolerance (±) |
| --precursor-window-type Da | Specify units of precursor mass error tolerance
(daltons Da or parts-per-million ppm). |
| --beam 0 | Beam pruning width to use during DRIP inference.
When 0, no pruning takes place so that exact inference
is performed. Setting this value to nonzero values, such
as 100 or 75, may be used to speed up
search time, though small values will significantly degrade search
results (single digit values should be avoided at all costs).
The beam pruning width specifies the number of most-probable
hypotheses in a particular frame which are not filtered (this method
of approximate inference is often called histogram pruning, and
specified as ckbeam in GMTK). |
| --high-res-ms2 F | Run DRIP low-resolution MS2 model. |
| --learned-means dripLearned.means | Use previously learned DRIP means for low-resolution MS2 model. |
| --learned-covars dripLearned.covars | Use previously learned DRIP covariances for low-resolution MS2 model. |
| --num-threads 8 | Use 8 CPU threads. If the supplied value is larger
than the number of processor threads, value is set to the maximum
number of processor threads. |
| --top-match 1 | Return the top PSM per spectrum. When recalibration is not set to true, the top PSMs per spectrum per charge are returned (differently charged PSMs are ranked separately, as opposed to being mixed and ranked together after recalibration). |
| --charges all | Search all spectrum charges. Specific charges may be specified
by passing in a comma-delimited string signifying the charges to be
searched. For instance, --charges 1,3 searches all
charge 1 and charge 3 spectra.
|
| --spectra plasmodium.ms2 | The MS2 dataset to search. |
| --output dripSearch-output | The base of the output file name. The search results will appear
in the local directory in file dripSearch-output.txt |
All options are further described in detail on the dripSearch page.
Recalibrating PSMs by charge
In order to compare differently charged PSMs, the scoring distributions of which may differ wildly (since higher charged PSMs contain more theoretical peaks and thus, on average, have fewer insertions and deletions than their lower charged colleagues), we recalibrate the searched PSMs by charge so that differently charged PSMs are comparable to one another.
We accomplish this by setting the --recalibrate
in dripDigest to True. DRIP search will then compare
differently charged PSMs and only return the top N PSMs
per spectrum, where --top-match N.
Search using a compute cluster
Note: if planning to perform a DRIP search over a dataset using a compute cluster, it is recommended to use the cluster functionality provided by dripSearch and to pass in the entire dataset of interest. DripSearch considers all spectra to provide upper and lower bounds on the theoretical spectra of scored peptides.
Setting the DRIP ToolKit environment variable for cluster use
-
The default cluster configuration assumes an environment
variable
$DRIPTOOLKITwhich points to the top-level directory housing the DRIP modules. Assuming the top-level directory <directory>, in order to correctly submit cluster jobs using the DRIP ToolKit, please add the following to your bashrc file (remember to replace <directory> with the absolute path of the top-level directory housing the toolkit):
You will have to log on again for the change to take effect.
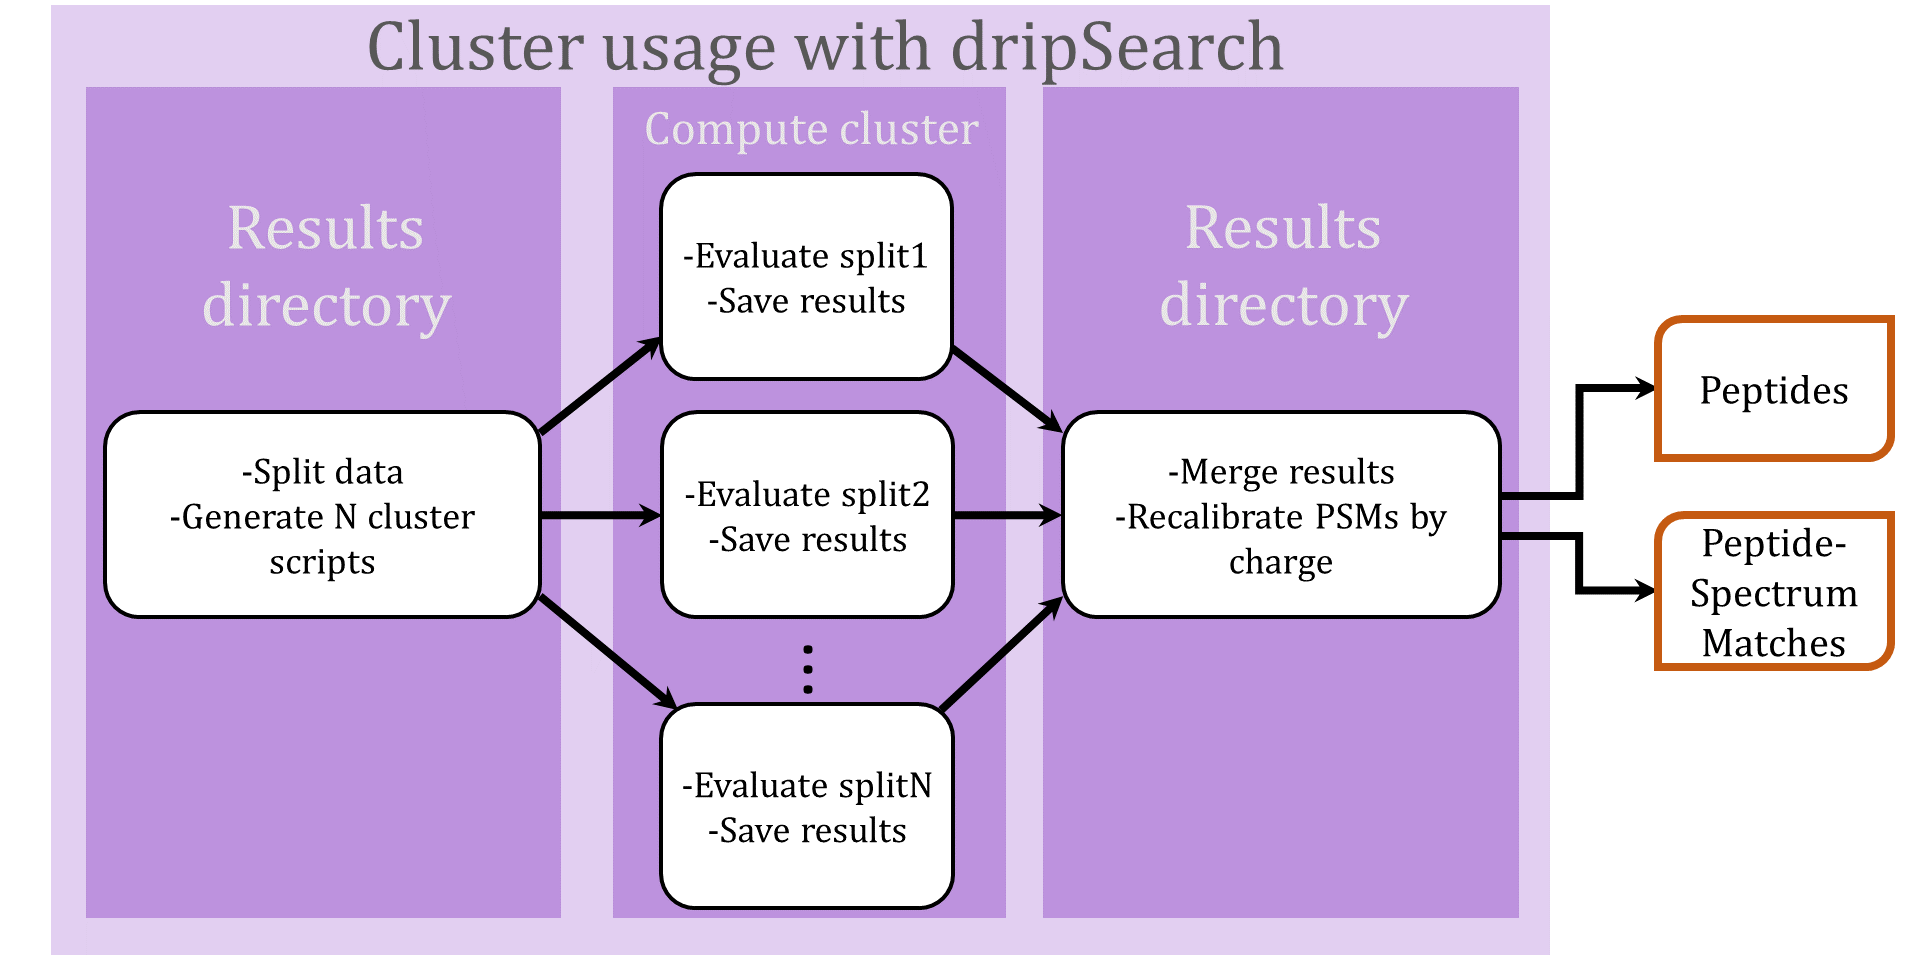
The DRIP ToolKit was designed with cluster use in mind. Evaluating a dataset over a cluster consists of three steps (illustrated in the above flowchart):
- Splitting the data and generating cluster jobs
To split a dataset for cluster use, add
--num-cluster-jobsto a typical call to dripSearch.py. For instance, returning to our earlier command line, we split the spectra and candidate peptides for datasetplasmodium.ms2into100cluster jobs by running - Running jobs on a cluster and writing each job's results back
to the local directory
Due to the many different existing cluster environments, dripSearch does not directly dispatch jobs to a compute cluster, but neatly packages the necessary data for each cluster job and generates bash scripts to be easily deployed to a cluster queue. The data for each cluster job will be written to the local directory
encodeand a list of scripts which run each individual job may be found inencode/clusterJobs.txt. By default, cluster jobs will be run in/tmp, but this may be changed by passing into dripSearch.py--cluster-dir <absolute path of desired run directory>. All results are written to the local directorylog.Customizing cluster job scripts
An example cluster script looks like the following:
In the above script, we generate a random directoryTMPDIRto run our job in, run dripSearch in cluster mode (--cluster-mode True), wait a random amount of time (so as not to flood NFS), and copy the results back to the local directorylog.In order to fit varying cluster environments, the scripts generated by dripSearch are easily customizable by editing
pyFiles/cluster.py. For instance, instead of running cluster jobs in /tmp, one could run on the scratch space of a compute node by editing lines 13-15 ofcluster.pyfrom
to
where we assume each compute node has scratch space/s0. - Merging the results
Once all jobs have completed, all results will be written to local directory
. To merge all results using dripSearch, we run
The output will then be written todripSearch-output.txt
Decoding and plotting DRIP PSMs in the python interactive shell
The DRIP Toolkit module dtk.py allows the instantiation
of PSM objects, decoding of DRIP PSMs (i.e., calculating the
most-probable alignemnt via Viterbi decoding), and plotting of
decoded PSMs in the python interactive interpreter.
In what follows, lines beginning with >>> denote commands
entered in the python interactive shell. When entering these
commands, do not enter the leading >>>.
Invoke the python interactive shell by typing in a terminal
As an example, we will decode PSMs for spectra
in data/test.sm2. We first load the DTK module and the
spectra into memory:
s is now a dictionary of ms2 spectra whose keys are the
each spectrum's scan number. For this demonstration, we assume that
DRIP low-resolution MS2 parameters have been learned
using dripTrain.py and the learned means and variances
were specified in output files dripLearned.means
and dripLearned.covars, respectively. For the
low-resolution MS2 spectrum whose scan number is 6028,
we now define a charge 2 PSM of the generating
peptide TGPSPQPESQGSFYQR as
p is now a dripPSM object with several attributes
detailing the decoded PSM, summarized in the following table
p attribute |
Meaning |
| p.peptide | peptide string |
| p.spectrum | observed spectrum, instance of spectrum object |
| p.scan | scan ID number |
| p.num_ions | number of unique b- and y-ions |
| p.num_dels | number of deletions |
| p.num_frames | number of observed peaks |
| p.insertion_sequence | decoded sequence of Booleans denoting whether the ith peak in the observed spectrum is an insertion or not |
dtk.psm() generates all
necessary GMTK files, efficiently performs Viterbi inference using
GMTK, and conveniently loads the Viterbi decoded information into
memory.
The dtk.py module provides functionality for
plotting decoded DRIP PSMs. Assuming matplotlib is installed
(Cygwin users may consult the following
for matplotlib installation instructions), we may plot the most
probable alignment between the theoretical and observed spectra for
the previously instantiated PSM by entering
The above command will create the
figure scan6028-charge2-peptideTGPSPQPESQGSFYQR.png in
the current working directory.
Plotting all PSMs output by dripSearch
Given a dripSearch output
file dripSearch-test-output.txt and searched ms2
file data/test.ms2, the decoded PSMs may be plotted
all at once by running
This will create several .png files, all which will
be listed in currPsms.html for easy browsing.
Plotting PSMs using Lorikeet
The DRIP Toolkit also supports interactive, in-browser analysis of PSMs via the JQuery plugin Lorikeet. Lorikeet version 0.3.5, available for download here, is currently supported (no earlier versions are guaranteed to work with the toolkit).
For the discussion that follows, denote the directory the DRIP
Toolkit was unzipped as DTK. To get started, download and unzip
Lorikeet
version 0.3.5 in DTK.
Invoke the python interactive shell by typing in a terminal
Given a PSM file and corresponding .ms2 file, the
module dtk.py may be used to generate the
Lorikeet .html files as in the following example:
The inputs to dtk.gen_lorikeet in the above example
are detailed in the following table:
| input variable | Meaning |
psmFile |
tab-delimited file of PSMs with
fields scan, charge, sequence,
corresponding to each PSMs scan number, peptide sequence, and
charge, respectively. |
ms2 |
.ms2 file searched to generate the PSM file psmFile |
scanField |
Specifies PSM scan number field as scan |
chargeField |
Specifies PSM charge field as charge |
peptideField |
Specifies PSM peptide string field as sequence |
scoreField |
Optional, specifies PSM score field as percolator score |
mods |
Modifications used during search (see dripDigest for more info regarding the specification of this parameter). Only static mods currently supported |
nterm_mods |
Nterminal modification (only a constant offset is supported in
Lorikeet, so X must be specified) used during search
(see dripDigest for more info
regarding the specification of this parameter). Only static nterm-mods
currently supported |
cterm_mods |
Cterminal modification (only a constant offset is supported in
Lorikeet, so X must be specified) used during search
(see dripDigest for more info
regarding the specification of this parameter). Only static cterm-mods
currently supported |
'genLorikeetPlasmoCruxPlots' |
Directory to write Lorikeet files in |
'genPlasmoCruxPsms.html' |
File containing one link to a Lorikeet .html per
line. Should be written
to $DTK/genPlasmoCruxPsms.html to ensures Lorikeet
files are correctly loaded. |
A new directory $DTK/genLorikeetPlasmoCruxPlots
containing a Lorikeet HTML file per PSM will be created, as
will an HTML file $DTK/genPlasmoCruxPsms.html containing a
link to each Lorikeet file.